Withdrawal
1. Support the front wheels. Raise the rear of the car and place it on stands (cm. "Lifting and placing the car on supports"). Remove the relevant wheel.
2. Remove the corresponding drive shaft (see chapter 8).
3. Turn out two bolts of fastening of an arm of a support and remove a support from a brake disk. Using a piece of wire, secure the caliper to the suspension spring, being careful not to pull on the brake hose.
4. Disconnect the parking brake cable from the wheel (see chapter 9).
5. Remove the ABS wheel sensor (see chapter 9, paragraph 20).
6. Remove the rear anti-roll bar (see paragraph 16).
7. Turn out a bolt of fastening of an arm of a brake hose on the trailing arm and remove an arm.
8. Jack up the rear of the trailing arm.
9. Turn out a bolt of the bottom fastening of the shock-absorber.
10. Remove the plastic pins, then pull out the clips and remove the fuel tank panel from the bottom of the car.
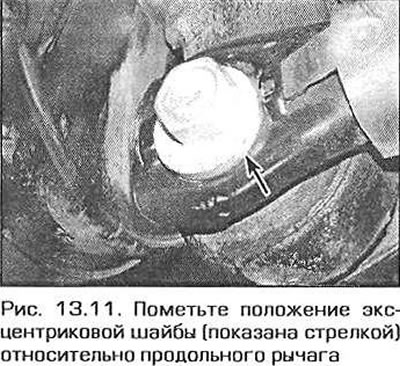
11. Mark the position of the eccentric washers relative to the trailing arm (pic. 13.11). Also, mark the position of the front arm bracket on the body. This is necessary to ensure that the rear wheels are correctly positioned during assembly.

12. Lower the jack and remove the spring.
13. Turn away a nut of an axial bolt of the bottom lever. Remove the bolt.
14. Turn away a nut and take out an axial bolt of the top lever. Pay attention to the location of the bolt.
15. Turn out three bolts of fastening of an arm of the longitudinal lever to a body and remove the lever.
Note. Do not loosen the lever axle bolt until until the bushing or bracket needs to be replaced.
Repair
16. Turn away a nut, take out a bolt and disconnect an arm of a forward support from the trailing arm.
17. Thoroughly clean the trailing arm around the mountings, removing traces of dirt and old sealant. Carefully inspect the lever for cracks, deformation, wear or other damage. Pay special attention to the support bushings. If bushings need to be replaced, contact a specialized service station as bushing replacement requires a hydraulic press and a set of spacer bushings. Inspect axle bolts and replace if necessary.
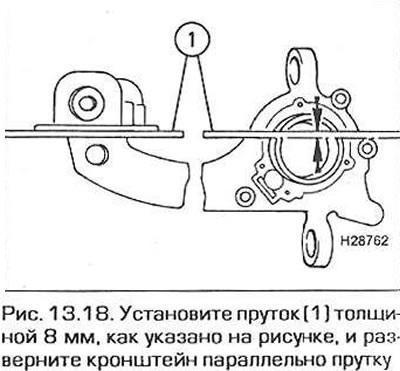
18. Install the bracket on the lever, insert the bolt and screw on the nut. With a steel bar 8 mm thick (pic. 13.18) install the bracket and tighten the bracket bolt and nut to the specified torque.

Installation
19. Raise the trailing arm and screw in the support bracket mounting bolts. Align the marks made before removal, then tighten the bracket mounting bolts to the correct torque.
20. Align the upper arm with the trailing arm and insert the bolt. Keep in mind that the bolt should be inserted from behind. Tighten the bolt nut by hand.
21. Install the spring, then raise the lever with a jack. Insert the lower arm axle bolt, fit the eccentric washer and tighten the nut. Install the washer in accordance with the mark made before removal, then insert the shock absorber lower mounting bolt. All bolts should only be hand-tightened for the time being.
22. Install the fuel tank panel on the bottom of the vehicle.
23. Install the brake hose bracket on the trailing arm and fully tighten its bolts.
24. Install the rear anti-roll bar (see paragraph 16).
25. Connect the parking brake cable to the drive lever (see chapter 9), then install the ABS wheel sensor. Reinstall the caliper and tighten the bracket mounting bolts to the required torque.
26. Install the drive shaft (see chapter 8) and lower the car to the ground.
27. Shake the car so that the suspension elements are installed, then tighten the bolts of the upper arm and lower shock absorber mounting to the required torque. Check that the lower arm eccentric washer has not turned, then tighten the lower arm bolt to the correct torque.
Note. Upon completion of work, it is necessary to check the camber and wheel alignment angles and, if necessary, adjust them.
